Posts Tagged ‘printing’

How to Curate a Gallery Wall in Your Home

Bold Presentation

In conjunction with other photography studios, I contributed to the Redfin blog. Given that they are a leading real estate website, dynamic images of homes and lifestyle are important to their clientele. Although they target people searching for a new home, they also provide resources on their blog for new homeowners now enjoying and setting up their new living space.

curate a gallery in your home with large, bold prints ©TimeLine Media

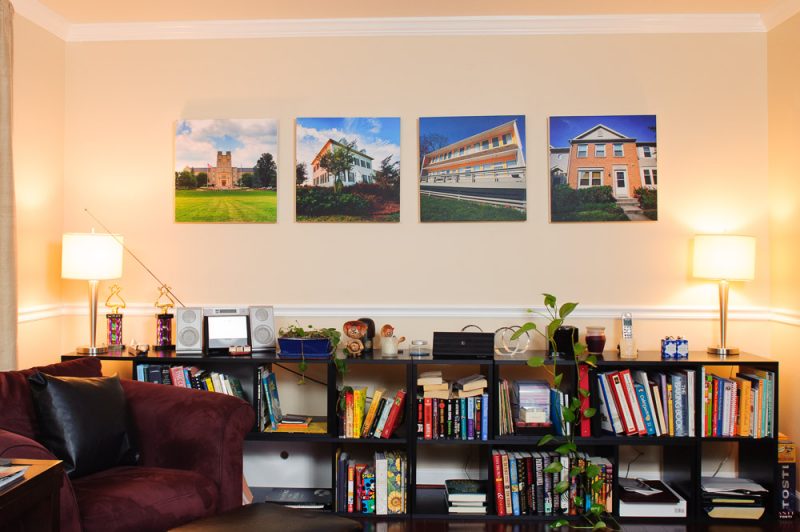
Curate a Gallery for Home

With this in mind, they reached out to photographers to give them some content about presenting photos in your home. Hanging photos is not a novel idea, however, there are many new options that update this decorating tradition. Regardless of your camera, these are available to you directly from print labs. Of course, I hope you would contact me to provide awesome images for your walls, but these options can be made from your smartphone! To see the article, here is the link on their website:

How to Curate a Gallery Wall in Your Home – Redfin

In reviewing the other contributions, there are some great suggestions for displaying photos! Because of our eyes being so calibrated to tiny screens from our phones, tablets, and computer monitors, these large prints make an impact! If you do not feel inspired by any of the images in your library currently, contact me and I would be happy to give you some ideas!

TimeLine Media – www.timelinedc.com
703-864-8208

Printing Image on Inkjet Printers Part 2

HDR Lincoln Memorial - ©TimeLine Media

Continuing on with my first printing project from my own inkjet printer, I first wanted to ensure that only the black ink was used in the next print. I clicked all the boxes in the dialog box to only use the black ink, but this had an unintended consequence. In choosing to only use the black ink, the printer dialog does not let you specify the type of paper. My thought was that the printer can handle this change and make the appropriate changes to get a good print. That was not the case! Here is the print:

Second inkjet print from black and white HDR image - ©TimeLine Media
Second inkjet print from black and white HDR image – ©TimeLine Media

Printing Setup

For the third attempt, I changed the paper type in the printing dialog box to match the type of paper I was using. In this case, I was using a “premium glossy” paper from Kodak. There was no specific settings or profiles for this particular paper, although I have seen instances where more professional papers and printers will let you set each. This made the biggest differences in the printing quality.

Third inkjet print from black and white HDR image - ©TimeLine Media
Third inkjet print from black and white HDR image – ©TimeLine Media

The banding is now gone, and the image takes on a picture-like quality. The first two attempts not only had banding, but you could see many of the components dots that make up the image much like duotone or newspaper printing. This third attempt, this is almost disappears completely, and gradients between the light and dark parts of the sky transition nicely between each. When you hold the photo at arm’s length, it looks almost like an optical print. I am happy with the results, but I think that I am limited with how far I can take this. If I do make any more prints, I will stick to small ones – probably 5″x7″ or smaller.

HDR Lincoln Memorial - ©TimeLine Media
HDR Lincoln Memorial – ©TimeLine Media

TimeLine Media – www.timelinedc.com
7
03-864-8208

Printing Image on Inkjet Printers Part 1

Lincoln Memorial - monochrome HDR - ©TimeLine Media

Because of the nature of event photography, and the way I sell my photos, I do not do any of the printing of these images using my own inkjet printers. With the amount of images that I need to print, and the number of different places that I need to send these, I outsource this task to professional photo labs. They have the expertise in doing this work, and they have the best in optical printing machines to create the best possible prints for my clients.

So, if you have come across this post because you have purchased prints from TimeLine Media before, please know that no changes will be made to how I create those photos. If I print using inkjets, it will only be for personal work for the near future. In this case it was the first experiment in printing on inkjets using this HDR photo from a recent walk in D.C.

Original File

Lincoln Memorial - monochrome HDR - ©TimeLine Media
Lincoln Memorial – monochrome HDR – ©TimeLine Media

This is an HDR image that was processed in HDR Efex Pro 2. It was subsequently converted to black and white in Silver Efex Pro 2. At this time, I wanted to try a monochrome image first. I thought it would be easier to see and fix any problems compared to adding color into the mix. Here is my first attempt with the default settings from my printer. Undoubtedly it is not pretty! To keep the changes to the images minimal, I kept the 4×6 aspect ratio. It was then printed onto 5×7 glossy paper:

Inkjet Print

First inkjet print from black and white HDR image - ©TimeLine Media
First inkjet print from black and white HDR image – ©TimeLine Media

Truth be told, I just hit print immediately, and did not even see a dialog box for printing settings. There is some serious banding problems in this attempt. In looking at the settings as the print was going through, the printer was using some of the color inks. It was not just using the black ink to create the print. For my second attempt, I made a few more changes in the dialog boxes prior to printing the next try.

TimeLine Media www.timelinedc.com
703-864-8208

1 2