Posts Tagged ‘technique’

Shooting From the Hip – Tech Thursday

Family Get Together

It has been about a week since my last posting – I have not fallen off the face of the Earth! We took an extended weekend to attend a wedding out of town. Of course, I took my camera with me. Now I have a whole slew of images that will make it on the blog soon. Today, though, I want to go back to a family get together to describe a looser, or a freer way of shooting to get a different style of images.

Playing-with-Waterguns-©TimeLine-Media

This late afternoon was very warm outside. What better way to cool off, than to play with some water guns? The ammo is unlimited, and everyone is a friendly target! This was a perfect time to try a specific technique for photographing kids that I have seen a few times but have not tried myself. First thing to consider – my professional camera bodies are weather-sealed at all of the openings. The connection between the lens and the lens mount is covered by a piece of rubber. This will keep the opening sealed for light water exposure. I have photographed with this camera and lens combination in the rain while covering a football game with no problems. I keep a towel handy, and would stop if there is a chance that much more water will be close.

Side Holstering

Playing-with-Waterguns-©TimeLine-Media

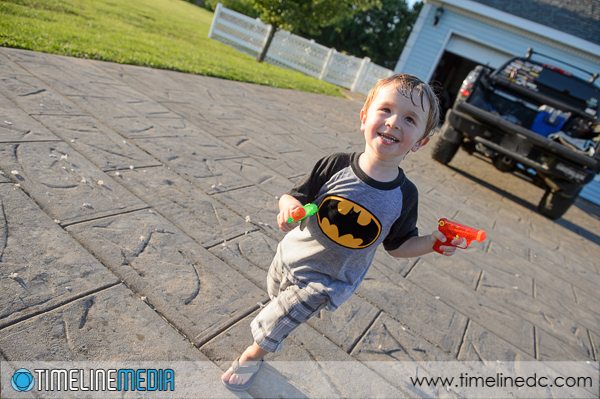
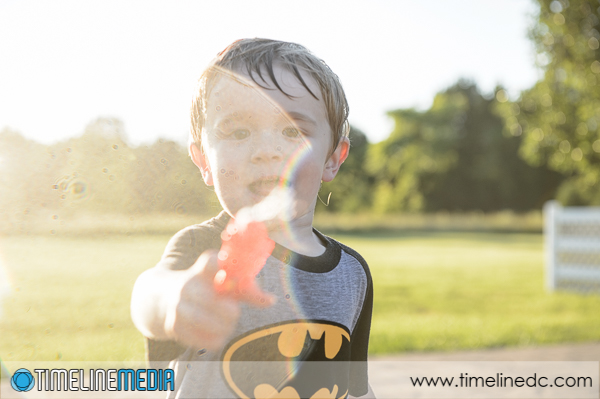
Knowing that I my camera could stand the water from the guns, I set the camera to a manual exposure so that the settings would not have to change as I fired off frames, and I had the shutter speed set high enough to ensure there would not be blurred photos while running. I had my nephew chase me and shoot at me with his water gun while I ran backwards with my camera pointing towards him. It was easy to get some neat shots of the water coming right towards the camera!

Playing-with-Waterguns-©TimeLine-Media

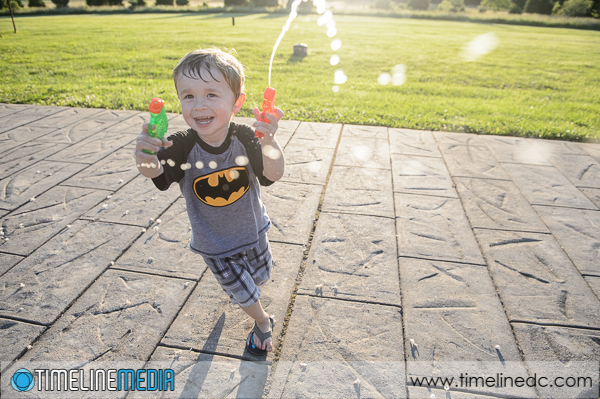
Be prepared to delete a lot of photos when you shoot this way. Lots of times, the composition was not perfect, and sometimes I would miss him completely, but so many of these came out nice. I do not think I could have composed these spontaneous images with my head behind the camera, and directing the scene. Sometimes, you have to just let that control go, and hope for the best. It’s just like having fun – you cannot plan every detail, but you may have better results than you planned!

Playing-with-Waterguns-©TimeLine-Media

TimeLine Media – www.timelinedc.com
703-864-8208

OnOne Perfect Effects – Tech Thursday

Post Processing

Almost there with getting through my backlog of photo edits! Just in time for the weekend coming up. I am scheduled to cover the That’s Dancing Summer Showcase on Saturday. If you will be dancing, please see me at the studio! I will be taking orders there for special event pricing for your photos. For today’s post, I will be looking at the OnOne Software Perfect Effects 8 plugin for Adobe Lightroom.

Washington Monument - out of camera - ©TimeLine Media
Washington Monument – out of camera – ©TimeLine Media

Lightroom Plugin

If you follow OnOne on social media, or if you are on their mailing list, they have lots of tutors and offers for their products. A few months ago, they offered this program completely free! I have wanted to try their software for a while, but I know that I do not have the time to really invest in a new program. After downloading, it easily integrates into Lightroom. To start working on an image, right click the photo, select “Edit In” then select “Perfect Effects 8”. You will then have the option to work on the original image (if it is a Tiff or JPG file) or to work on a copy with Lightroom adjustments (if it is a RAW file).

OnOne Software Perfect Effects 8 - ©TimeLine Media
OnOne Software Perfect Effects 8 – ©TimeLine Media

The program will open and you have all the presets listed on the left. When you select one of the presets, the large preview in the middle of the screen will change with each selection. On the right panel, you can see that Perfect Effects uses layers, much like Photoshop, to have more control over the adjustments. For this preset, I like the saturation that it adds to the sky and the grass. Here is the photo after export-

Washington Monument - Magic Forest preset from Perfect Effects 8 - ©TimeLine Media
Washington Monument – Magic Forest preset from Perfect Effects 8 – ©TimeLine Media

The presets have a large amount of choices to change your images. You can add borders, grain, you can even make tilt shift images with their blur options. Many of these functions are already available from mobile photo editing apps, but now you can have this in the desktop. The control that you have over them can be fine-tuned with the layers in Perfect Effects 8. I will definitely try more of this with future projects to see the power of the program, but as a first try, it is really impressive!

Washington Monument with grain and borders from Perfect Effects 8 - ©TimeLine Media
Washington Monument with grain and borders from Perfect Effects 8 – ©TimeLine Media

TimeLine Media – www.timelinedc.com
703-864-8208

Follow Subjects for Better Photos – Tech Thursday

Technique

It has been a very busy ballroom dance photography time! We have had a lot of amazing events to cover in the last month. I am finally completely through all of them and have them available to view online. We do have a little break here until we have another dance event. With this in mind I am taking a step back to review the images. With a few new photographers helping us at events, I have been asked about how I take photos. This is probably the most I have reflected on this process in a while. Usually I am just worried about getting to the location, and getting setup. Finally I make sure we have everything to do the job successfully without losing any images.

American Star Ball Championships - ©TimeLine Media
American Star Ball Championships – ©TimeLine Media

My best piece of advice for photographing ballroom dance or any sporting event, is to follow your subjects with your eye in the viewfinder. Some of the dancers are moving so fast that you would not be able to catch that moment in a frame. By the time you see the moment, then put your eye to the camera, the dancers may already be passed you, or their position may have changed where now the angle is not quite right. If you always have your eye in the camera, and follow the action, you will have a much better chance of catching that perfect frame of very fast action.

Dance Photography

Baltimore Dancesport Challenge - ©TimeLine Media
Baltimore Dancesport Challenge – ©TimeLine Media

This lesson is applicable on both a crowded dance floor or on a showcase of only one couple on the floor at once. If you try to photograph at Professional Standard competition, there are only a few moments where you can catch both dancer’s faces in the light. Their constant closed hold makes it easy to get either one of the dancers, but getting both can be tough unless you are tracking their movements. If there is only one couple on the floor, the job is easier as the distractions are much less. But all the same, you cannot just watch them with your eye out of the viewfinder, then see them start a line, and expect to get it framed up and captured well. This is the challenge, and the fun of photographing dancers on the floor! I am sure as I go through more of these photos, I will come up with more tips. I hope you enjoy all the photos currently on the website, and I will be back to making more soon!

Arthur Murray Spring Freestyles - ©TimeLine Media
Arthur Murray Spring Freestyles – ©TimeLine Media
USA Dance Mid-Atlantic Championships - ©TimeLine Media
USA Dance Mid-Atlantic Championships – follow dancers on the floor ©TimeLine Media

TimeLine Media – www.timelinedc.com
703-864-8208

1 2 3 4 5 6 19