Posts Tagged ‘software’

White Balance for Skin Tones – Tech Thursday

©TimeLIne Media - people photo with a warmed white balance

Cool. Warm. These descriptive words for temperature is used widely in photography. From looking at other amateur photographers wanting to improve their photos, this is one of the first places I look at this time. Back in the film days, the color temperature of your images would have been built into the film and processing that was used in development of the negatives of slides. Today, however, the temperature of your photos can be set right in the camera, and changed as needed. In your camera settings, you look to the White Balance settings to set the color temp.
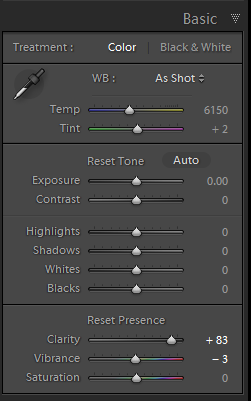
Post Processing

There are presets that manufacturers use to separate different light temperature. From cooler to warmer, the presets are usually Incandescent, Tungsten, Daylight, Flash, Cloudy, Shade, but the settings on yours may differ. In some cameras, there is also a “K” setting which stands for Kelvin temperature. With this setting you can finely tune the temperature by selecting the Kelvin setting of the light you are shooting. The scale will go from something in the 2500K range on the cool side, to 10000K on the warm side. Take some example photos, and you can see the changes as the temperature goes up in the frame. Skin tones are where you can see the changes the most:

White Balance Example

©TimeLIne Media - White balance for skin tones
©TimeLine Media – White balance for skin tones

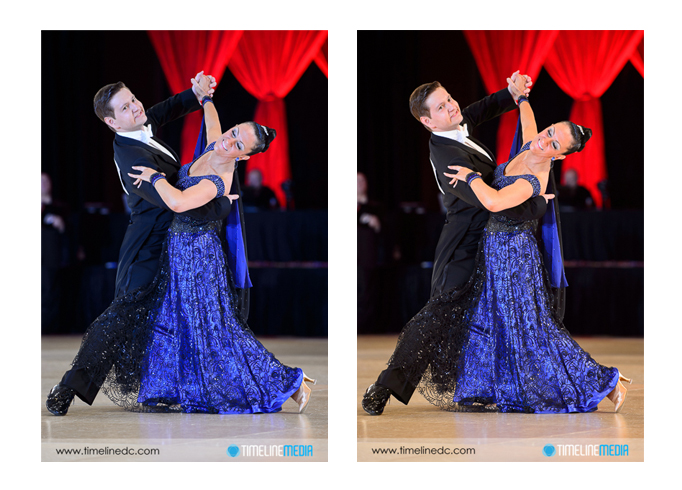
The photo on the left is set to “Auto” in the White Balance setting. For me, the skin tones are too “cool” for my taste. Moreover for anyone that has ever been to a ballroom dance event knows that tanner is better for skin tones! The same is true when editing any portraits or group shots. Skin tones always look better warmer. This is an almost universal rule that I have learned in my photography. People look healthier, and more natural even if the skin tone does not exactly match the tone in real life.

The automatic settings in cameras or software may not give skin tones their best look. Comparatively, observe the variety of photos you come across on social media, or in your own collection, and see how they can magically be improved with adjusting one setting! Let me know how this works for you! Especially let me know if you have any other questions on how to set this on your own cameras or software. Although it is a quick fix in post, it can make a large difference!

©TimeLIne Media - people photo with a warmed white balance
©TimeLine Media – people photo with a warmed white balance

TimeLine Media – www.timelinedc.com
703-864-8208

Clarity – Tech Thursday

©TimeLine Media - enhancing details in hair with the Clarity slider

My photographic style is constantly evolving when it comes to my portrait and personal work. Since I have started shooting professionally, my style changed quite a few times. Whether this is normal for a photographer, I do not know! It seems like my style changes as software updates brings functionality to RAW processors. With each new feature,  I try what new changes I can make to photos, and implement them to more shoots. Also, my editing eye gets fatigued in putting the same effects to photos which is probably why I do not have many Lightroom Development presets any longer. My favorite slider that I am using more and more is the Clarity slider under “Presence” in the Develop module.

Adobe Lightroom - Develop Module Basic panel
Adobe Lightroom – Develop Module Basic panel

Adobe Lightroom

Clarity is a tool that has long been a part of Lightroom, but I have not used it much until version 4. It is a mid-tone adjustment which when applied to portraits, can give images a crisp edge that makes it look sharper overall when the value of the slider is increased. There is a contrast adjustment component to this slider that really focuses on edges as opposed to the entire frame making it less harsh than the Contrast slider when pushed to the limit. This works especially well with male portrait subjects or landscapes. On the other end of the scale, pushing the Clarity slider down will decrease edge sharpness and will soften edges. This was can easily be overdone resulting in a vaseline-on-the-lens look from vintage television programs.

©TimeLine Media - Clarity slider example
©TimeLine Media – Clarity slider example

For the image above, the image on the left is with the default settings out of the camera. The image on the left is the same image with the Clarity slider adjusted to +83. It gives a grittier more edgy contrast that brings out more details in the portrait subject.

Pet Portraits

©TimeLine Media - enhancing details in hair with the Clarity slider
©TimeLine Media – enhancing details in hair with the Clarity slider

Just like every other slider that you can use on an image, it can be overdone. Just move the slider until you can see the Clarity effect start to show in hair, or around the eyes, then stop moving. For the most part, you can push it all the way to 100 without it having it destroy the photo, but it may become a muddy mess with dark areas that are crushed to nothing, and having it creep to areas that you do not necessarily want too dark. If printing the images, I use the default output print sharpening settings after adjusting sharpness with the Clarity slider. I have been pleased with the results so far!

©TimeLine Media - Portrait
©TimeLine Media – Portrait

TimeLine Media – www.timelinedc.com
703-864-8208

1 2 3 4 5