Posts Tagged ‘still life’

Outrunning the Curtain – Tech Thursday

Fashion Show with off camera flash - ©TimeLine Media

Testing

Flash photography is different, not difficult! Natural, or available is easier in the way that Microsoft Word is an easy as a text editor. With available light, what you see if what you get. There is no guessing as to the effect that the light will have on your subject in the photo, because you can see it even without looking through your camera. I am trying to step away, and attempting to use flash in every situation that I can. It is a challenge, but I think the results can be much better, and the files much easier to work with in post. This post is about the first lesson is using a flash off the camera. This can be a speedlight that you attach to your camera with a cord, or wirelessly – it does not matter which for this article.

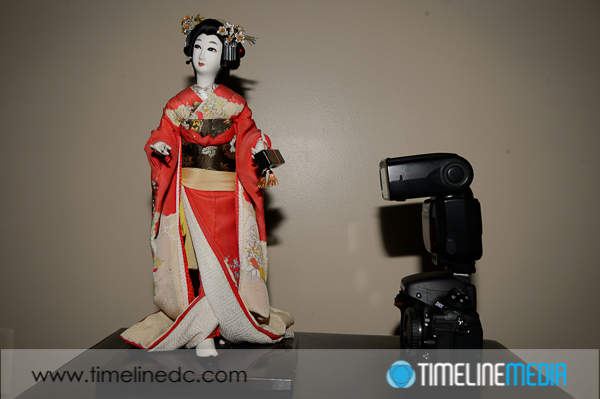
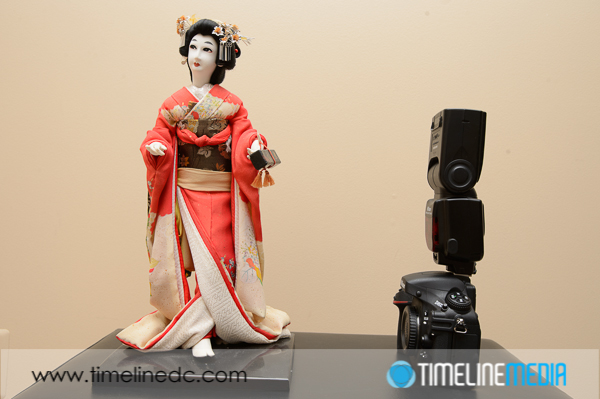
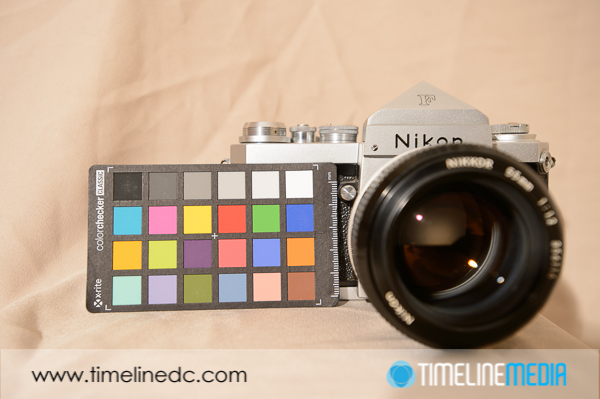
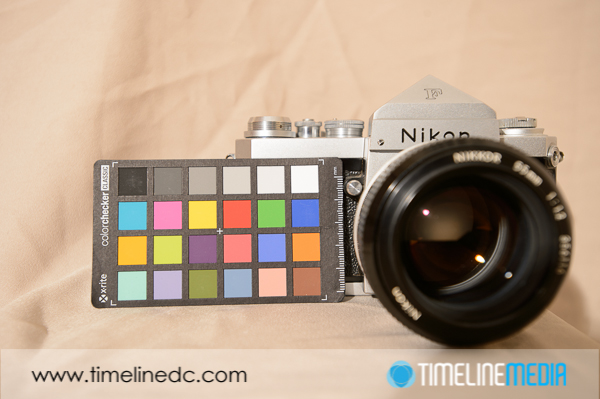
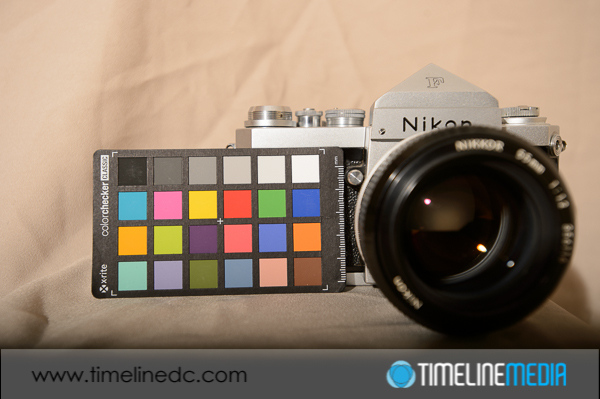
Every camera has a set flash sync speed. This is a fastest shutter speed at which the flash can illuminate the full frame of the camera with light. Any shutter speed slower than that will also light the frame fully, but any speed faster will start to darken the frame. As an example, here are some photos where I attempted to keep the same exposure, only changing the shutter speed. The settings are in their captions:

1/60 sec, f/6.3 - ©TimeLine Media
1/60 sec, f/6.3 – ©TimeLine Media
1/125th sec, f/5 - ©TimeLine Media
1/125th sec, f/5 – ©TimeLine Media
1/200th sec, f/5 - ©TimeLine Media
1/200th sec, f/5 – ©TimeLine Media

Shutter Speed and Flash

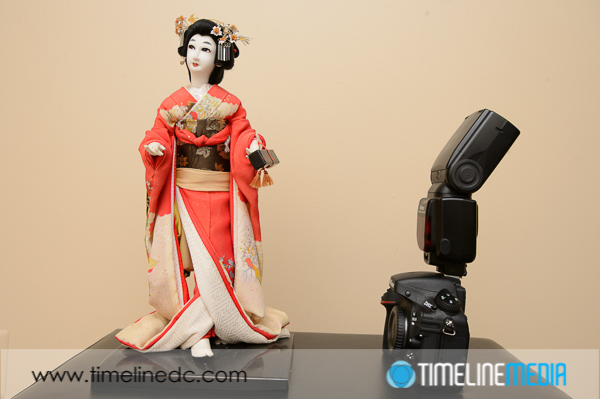
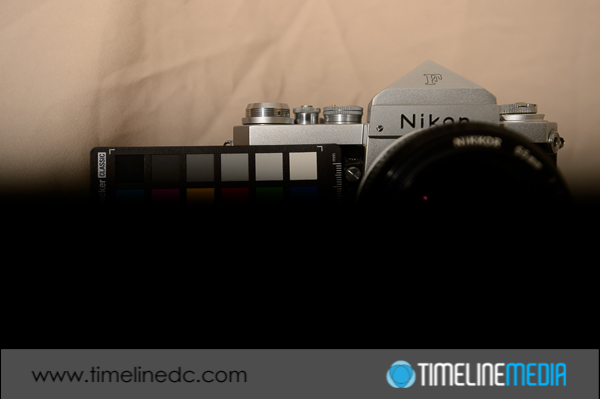
All of the above photos have shutter speeds slower than the sync speed of 1/250th of a second. This sync speed will vary with your camera, so consult your manual to find it for your particular model. Now the next photo is at 1/320th of a second, and the frame starts to darken from the bottom.

1/320th sec, f/5 - ©TimeLine Media
1/320th sec, f/5 – ©TimeLine Media

This darkening is from the curtain that covers sensor. Its movement determines the shutter speed settings on your camera. It moves faster across the sensor as you increase the shutter speed. When you make an exposure with a shutter speed that is too fast, you start to catch the curtain in the frame when the shutter speed is too fast.

1/500th sec, f/5 - ©TimeLine Media
1/500th sec, f/5 – ©TimeLine Media
1/800th sec, f/5 - ©TimeLine Media
1/800th sec, f/5 – ©TimeLine Media

So if you are just starting to experiment with off camera flash, make this your first options to set on your camera. Conversely, check this setting if you are on a shoot and seeing something strange on the image. I’ll bet it is the curtain. This will save you a lot of frustration especially in bright settings! Give it a try with your camera to find your flash shutter sync speed.

Fashion Show with off camera flash - ©TimeLine Media
Fashion Show with off camera flash – ©TimeLine Media 

TimeLine Media – www.timelinedc.com
703-864-8208

Leaf Shutter Lenses Part 2 – Tech Thursday

Outdoor portrait with leaf shutter lens and flash - ©TimeLine Media

Last Tech Thursday, I had the first post on using leaf shutter lenses. In doing a little research, there are not too many of these that are available in convenient or “affordable” kits. The ones that are available cost most than most DSLRs bundles with lenses – for the lens alone! These are normally in the realm of the medium format cameras with much larger sensors, and much higher price tags. A new medium format camera is in the $15,000 – $40,000 range with the accompanying leaf shutter lenses starting at $4500+.

So you can see why I was excited to learn that the relatively inexpensive Fuji X100s has a leaf shutter. As a refresher, here is a photo taken without any added flash outside. It is the metered exposure from the camera, and has a nice shallow depth of field with the trees and the shed going out of focus. The settings were 1/1000th second at f/2.0 ISO 200. The shutter speed was very fast due to the open aperture. There was bright sun that is starting to set but is still high overhead.

Flash Photography Test

Flat outdoor portrait without fill flash - ©TimeLine Media
Flat outdoor portrait without fill flash – ©TimeLine Media

With a typical DSLR, you would not be able to use these settings to get proper exposure*. The 1/1000th of a second exposure time is too fast for the flash to fully expose the frame. You will have a black bar along one of the long sides of the frame where the shutter is still covering part of the frame. You are limited to 1/200th or 1/160th of a second on most cameras. To find your, look in your manual, and look for the maximum flash sync speed. On the Fuji X100s, however, the leaf shutter lens is able to sync with the flash up to this fast shutter speed. This is the biggest benefit to using these types of lenses – having more control over balancing the available light in the scene with added light from a flash or strobe.

Outdoor portrait with leaf shutter lens and flash - ©TimeLine Media
Outdoor portrait with leaf shutter lens and flash – ©TimeLine Media

You can keep the nice darker blue sky, and saturate the other colors by underexposing the background with a high shutter speed. The flash power you can control from the strobe or by adjusting the aperture. Even though in some of these, the aperture was not wide open, it was only closed about 1 stop which keeps the background nicely out of focus compared to your subject. I cannot wait to do more shooting with this setup! It gives a lot more flexibility in what time of day to make outdoor portraits.

Outdoor portrait with leaf shutter lens and flash - ©TimeLine Media
Outdoor portrait with leaf shutter lens and flash – ©TimeLine Media

TimeLine Mediawww.timelinedc.com
703-864-8208

Flash basics – Tech Thursday

Flash with head in position to bounce off ceiling - ©TimeLine Media

Testing with a Statue

Today, I have been reviewing previous posts about a new camera, or perhaps a flash. I have been making these posts from the side of what advice would I give to someone that just received a new DSLR for Christmas and what would they do with their new toy. After the first few weeks of just taking photos, getting comfortable with how the camera feels in the hand, and being confident that it would not lose any of the photos that you take with it.

One of the first accessories that people use frequently, but often incorrectly, is the flash. Going around the tourist areas, or looking at the crowds at sporting events, there are so many people that use their flash. This is because the photos from their camera using their default settings are too dark for the situation. Indoors under artificial light, or any photo taken at night, the flash will pop on your camera to brighten the scene. You will definitely make your photos brighter with the flash, but a lot of times, the light will be ugly! Here is the reason why, and how you can make it better.

Flash with head pointed directly at subject - ©TimeLine Media
Flash with head pointed directly at subject – ©TimeLine Media

This first image shows the default direction for a speedlight flash mounted on a camera. The thinking here is what you want to brighten is right in front of the camera. So, firstly, point the flash directly in front of you. This will get you a sharp, bright photo. Likely, only whatever is right in front of the camera will get the light. There will be a dark, harsh shadow right behind your subject if you pose them against a wall. To make this light better, you can take your speedlight and point it straight up to the ceiling. Doing this will “bounce” the light from the ceiling back down to your subject.

Bounce Light

Flash with head in position to bounce off ceiling - ©TimeLine Media
Flash with head in position to bounce off ceiling – ©TimeLine Media

The result is that the light becomes very soft against your subject because you have made the light source much larger. Instead of coming from the front of the flash before hitting your subject, the light is spread out across the ceiling and surrounding walls. By the time it hits the subject, it is much larger in area, which makes light much softer. Easy!

Flash with head in position to bounce off ceiling - ©TimeLine Media
Flash with head in position to bounce off ceiling – ©TimeLine Media

Some speedlights have a little white card inserted at the front of the flash. Pop this little accessory up to direct just a little more of the light forward if you are photographing a person. This will brighten their faces nicely with not as harsh a shadow behind the subject and keeping the overall light in the scene soft. If you are in a place with very high, or no ceiling, you can even point the flash directly behind the camera to bounce off a wall in back of you. It can give a similar result to bouncing off the ceiling. There are many other tips on using your speedlight flash, this is just the beginning. If you have any more questions on how to use your flash, let me know!

Flash with head in position to bounce behind wall - ©TimeLine Media
Flash with head in position to bounce behind wall – ©TimeLine Media

TimeLine Media – www.timelinedc.com
703-864-8208

1 2 3