Posts Tagged ‘tech’

Photomerge using Photoshop CS5 – Tech Thursday

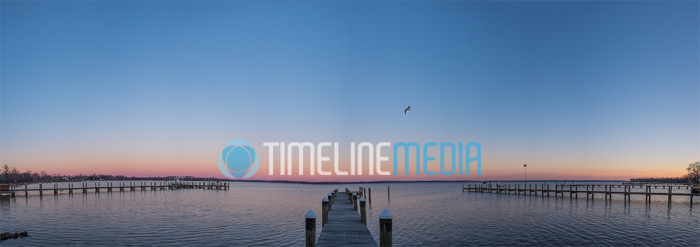
Pier Panorama of 14 combined images - ©TimeLine Media

From readers, I have received a lot of feedback and questions about the panoramic images I have posted. The added feature to smartphone camera apps and having it built into some digital cameras has made the practice of stitching photos more popular. It is now possible to expand the dimensions of images using multiple angles of the same scene. There are products that you can add to a tripod mount to make your panoramas more precise, and there are even robot controllers that can make multiple images for you to make stitched GIGA-pixel images.  

Photoshop Stitching

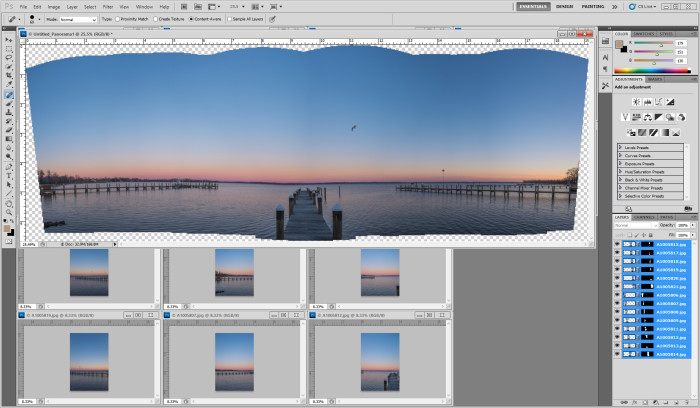
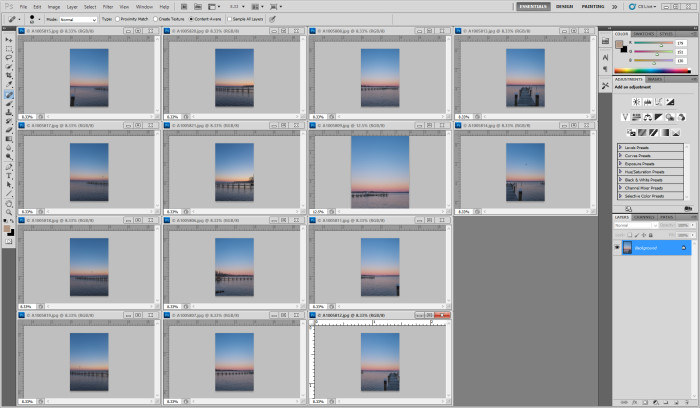
14 images opened in Photoshop

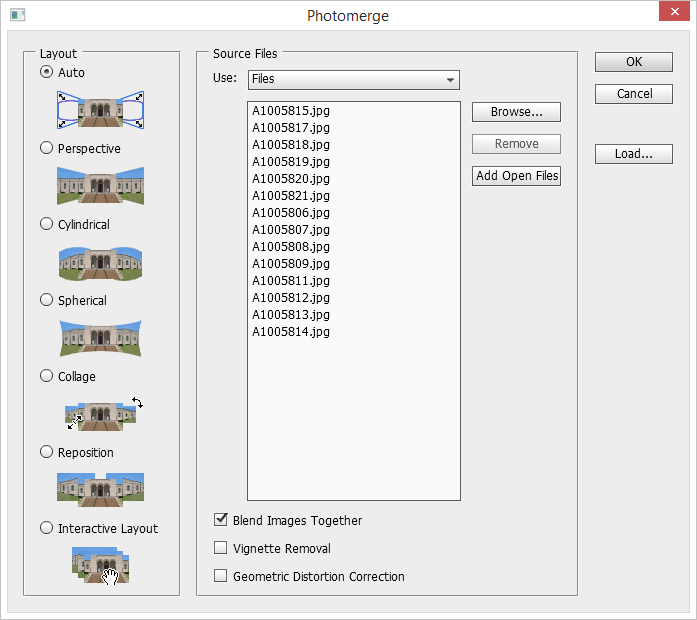
Since I am doing all of these hand held, I need to rely on the Photomerge function in Photoshop CS5. The first step was to open the 14 images that I intended to stitch together. There were taken in portrait orientation so that I could get more room to crop than if taken in landscape. Then, go to File > Automate > Photomerge:

Photomerge dialog box in Photoshop CS5

The result shows all the work that Photoshop does for you! It blends the images using the overlapping elements that were in each frame. The more information that it has to work with, the better the blending. I was happy with how the combination of the images turned out except for one section where the horizon dips a little in front of the middle pier. That area would have to be corrected manually – maybe in a future blog post!

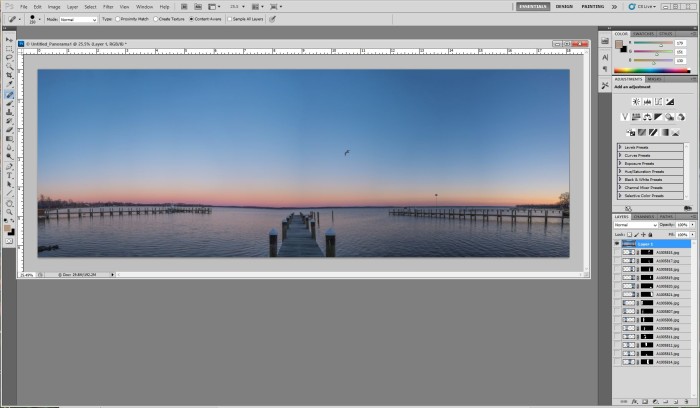
Images stitched together - ©TimeLine Media
Images stitched together – ©TimeLine Media 

To finish the image, I make a new layer above these with all the lower layers flattened into one. Now I can work with all of these merged, but I still have the previous work still available so I can work without destroying the previous step.

Images stitched together - ©TimeLine Media
Images stitched together – ©TimeLine Media

Now I just use the spot healing brush, and run it over the blank spots in the cropped image. This tool works really well for this image because of the large expanse of cloudless sky. You may have more trouble if the images you are using are busier, but you would be surprised at how good the math is with this tool!

Pier Panorama of 14 combined images - ©TimeLine Media
Pier Panorama of 14 combined images – ©TimeLine Media

TimeLine Media – www.timelinedc.com
703-864-8208

New Camera – Part 1

©TimeLine Media - X100s in low light

The photos are coming along from last weekend nicely! It is a privilege to see all the routines from the day even though it is impossible to see them all because of the two ballrooms. I think my associate photographers did a good job covering the event for you, and I am working quickly to get these done and on the website.

Camera Testing

For today’s post, I wanted to write about a new camera that I have started to use. I have a full compliment of bodies, lenses, and accessories for my Nikon DSLRs, but it became apparent during the summer walkabouts, that it is simply too heavy to carry around all day. A fatigued photographer is a compromised photographer, and there will likely be some photos that you will miss. In researching a suitable substitute for all that gear, I found the Fujifilm X100s.

Fujifilm X100s - image provide by Fujifilm Global
Fujifilm X100s – image provide by Fujifilm Global

This is one of the new large-sensor mirrorless cameras that has been released in the last 2 years. This class of cameras is becoming very popular because of the lightweight bodies, and superior image quality. The camera has a fixed focal length 23mm lens which translates to 35mm on a full-frame sensor. The aperture of this lens can open to f/2 allowing excellent low light performance. Using these technical specs, I decided that this would probably suit just fine as a substitute for my “big” cameras. After it arrived, I had to hop on a learning curve, that will be a long run to being comfortable.

Portrait Photography

©TimeLine Media - X100s in low light
©TimeLine Media – X100s in low light

Before I went into the more complicated features, I started at the basics. The first thing I noticed, is the weight – this camera is so light! It was much lighter than I expected, but the ergonomics makes it really easy to hand hold. The rangefinder-like viewfinder is HUGE making composing photos very easy. The lens on this camera is tack sharp even at f/2. The above photo was taken wide open with just overhead lights. With the large aperture, I could still get a sharp photo at ISO 400. I was happy with how it performed, but with my first shoot, it was clear that this was clearly not the same system I have been used to.

TimeLine Media – www.timelinedc.com
703-864-8208
Watermark Images – Tech Thursday

©TimeLine Media - Fairfax Corner Christmas Tree Lighting

A few readers and Facebook friends have asked about how I watermark my images. This is the “TimeLine Media” bar that I add to the bottom edge of all the photos I post online. Currently, there is a hot debate online about the use of watermarks when posting photos online. With software, most watermarks are easily removed, and their addition to your image will add a VERY distracting element to the frame.

Yes, it may deter some from stealing your image, but if someone is out to take your image, they would never have been a paying client for you whether you added the it or not. That being the case, I continue to add watermarks to all my images – selfishly to see the images used around the web, and in case I forget that I made a particular photo. In case you were wondering, if you purchase a digital download (any size) from the proofing website, there is no mark whatsoever on the file. If you paid for it, you should have a clean image! As the debate goes on, I may change my stance on my personal posting, but for now, the watermarks stay. Here is how to watermark your images easily with  Adobe Lightroom.

Adobe Lightroom

©TimeLine Media - Fairfax Corner Christmas Tree Lighting
©TimeLine Media – Fairfax Corner Christmas Tree Lighting

First, create a PNG file in Photoshop or other image editor like Microsoft Powerpoint with the design that you want for your watermark. I have a transparent bar at the bottom with my logo and text with my website. The file is sized 600 px by 400 px, my default size for posting images on the blog. Create your watermark with a transparent background, then save as a PNG file which will preserve the transparency over the larger part of the image which you do not want covered in any way. This is easily done in Photoshop, and here is a screen shot from my layer setup of the watermark image.

Watermark Images

Adobe Photoshop - watermark setup
Adobe Photoshop – watermark setup

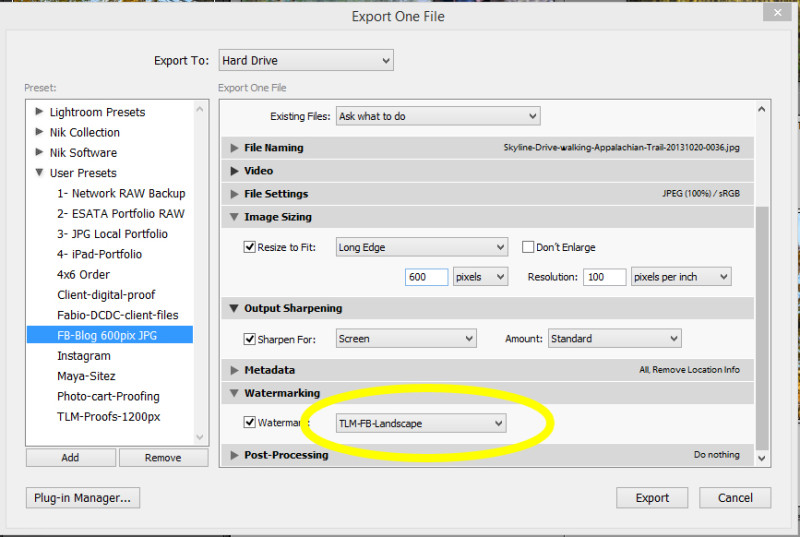
In Lightroom, you can add a watermark at the bottom of the Export dialog box. From this box, you can add a text watermark such as “©TimeLine Media” or you can select your PNG file as your watermark. You can adjust many settings in this box including the font of the watermark (if using a text watermark). how much the watermark takes up in the photo, and whether you want it in a corner or over the center of the image.

Lightroom Export Image dialog box

With Lightroom, you can select a group of photos to export at one time. If you choose to add a mark with this dialog box, it will add it to every image you export. If you like how it looks, and you think that you will use it more in the future, you can create a preset of your watermark that you can add with one click each time you import a batch of photos. Let me know how this goes for you, or if you have any other questions on how this is done. If you have any thoughts on the use of watermarks in general, please let me know!

TimeLine Media – www.timelinedc.com
703-864-8208
1 5 6 7 8 9