Posts Tagged ‘technique’

Cropping – Tech Thursday

©TimeLine Media - 4x6 crop

There are some constants that survive no matter how much photography evolves. Because of standards organizations, we had film speeds in ASA or ISO that now go by light sensitivity on digital cameras and F-stops for describing aperture openings. The softer “standards” that have survived include cropping dimensions of photos for presentation.

Photo Dimensions

8×10, 5×7 – these dimensions are some of the popular frame sizes that are sold here in the US. When my customers start looking at purchasing photos, these are the sizes that they purchase the most – why? These are the frames that are available in the decorator and craft stores. The problem? Look at the files that are coming out of your camera at this time. If you have a DSLR, the dimensions of the files that it makes are 4×6! This goes back to the days of film. 35mm film was the most popular consumer and small-format professional size of film that was available. For this reason, manufacturers keep the form of the cameras and the lenses the same as film cameras. With this in mind, most sensors have retained this ratio.

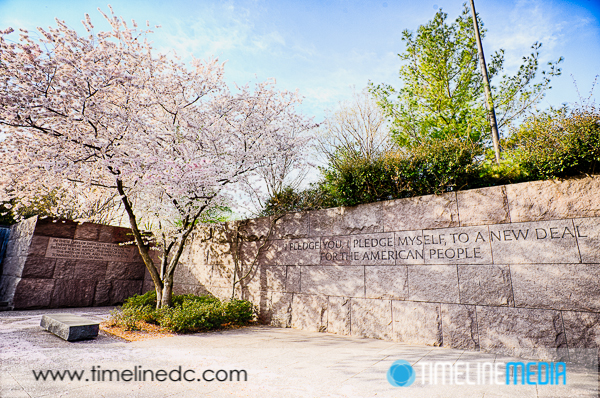
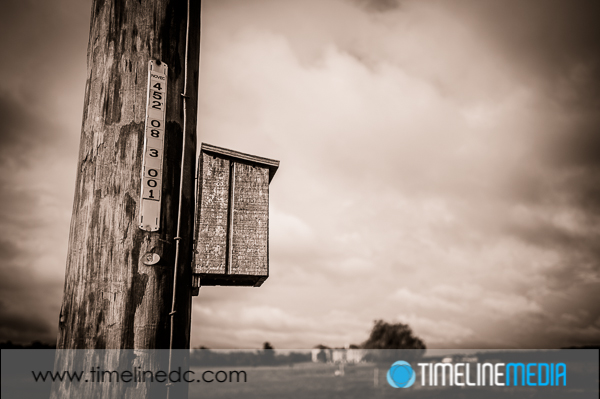
What this means is that if you want to have an 8×10 photo that is printed edge to edge, you need to crop your image files. Cropping is much easier in software than after the photos has been printed. It is non destructive, and it can also be used to improve composition of your image. To make an 8×10 image, the original file needs to be cropped down from 4×6 to 4×5 to fit on the page without borders. Here is an example:

©TimeLine Media - 4x6 crop
©TimeLine Media – 4×6 crop

8 X 10 Frames

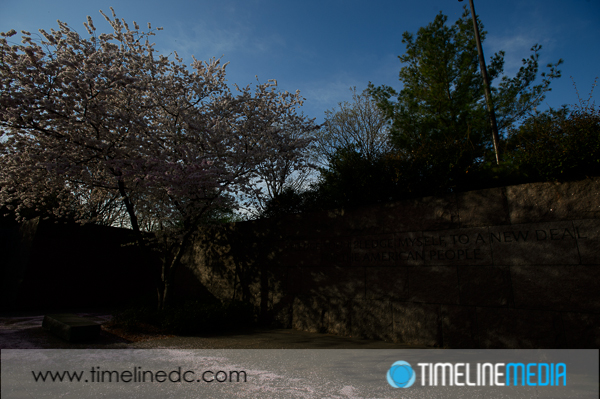
The 4×6 crop is more “panoramic” with a long dimension left to right in the frame. This is popular for landscapes and can give a better sense of scale. To fit this image into an 8×10 frame, however, a crop is needed. In trying to keep it close to the original composition, I didn’t move the frame in the software and came up with this:

©TimeLine Media - 8x10 landscape crop
©TimeLine Media – 8×10 landscape crop

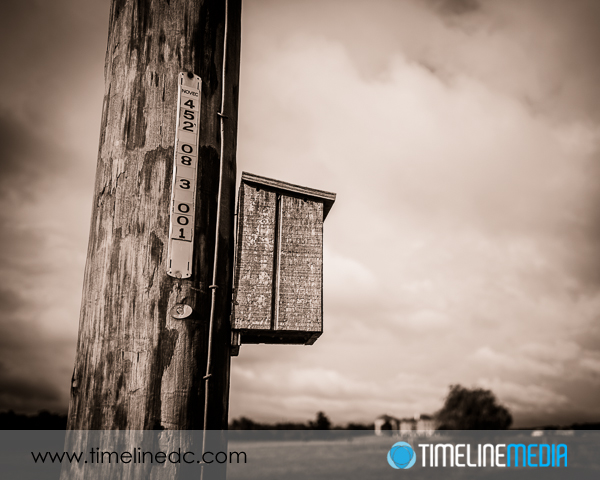
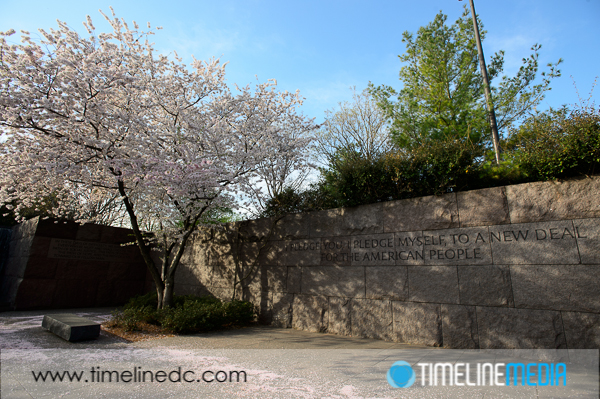
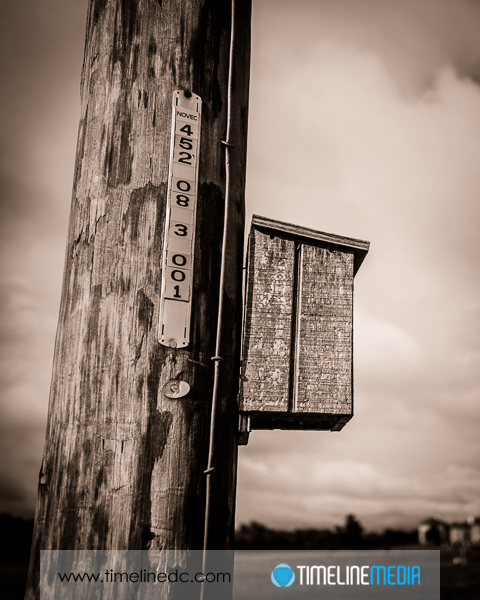
The frame looks much different to me! Even though printed it would be a “larger” photo, I think it feels more cramped. It doesn’t convey the open space that the photo was taken, it seems like many of the elements are much closer together in the frame – the house in the background with the box in the foreground. Now changing the 8×10 crop to a portrait mode (where the longest size run up and down) the background house is a much smaller part of the images, an the emphasis goes back to the foreground. The best part is that you can change these easily in software until you really find the photo that suits you best.

©TimeLine Media - 8x10 portrait crop
©TimeLine Media – 8×10 portrait crop

TimeLine Media – www.timelinedc.com
703-864-8208

HDR photography

©TimeLine Media - HDR photography in Washington, DC

One of the first lessons I learned in photography was that cameras “see” much different from the human eye. If you look around a closed room, then out a window, not only does the eye focus much faster than any lens, but it can take in much more detail than you realize. This happens so quickly, that you do not even realize drastic light condition changes. With this in mind, HDR photography can render a scene closer to this.

High Dynamic Range Photography

When studying photography, you can see that you have to make compromises. In a high contrast scene, such as a bright sunny day, you cannot have a blue sky and shadowless subjects in the foreground without some help. You either have a beautiful sky with your subjects in silhouette, or dark shadow, or you have a completely “blown out” white sky with detail in your foreground subject. You do have some options if you want to manipulate the light such as flash or bouncing light to your subjects with a reflector, but I want to post today about another new option that has become popular with the advancement of computers – HDR or High Dynamic Range photography.

HDR is an option for shooting with the new iPhone 5. The idea behind it is to take multiple images of your scene. In a 3-image HDR, one of the images will be underexposed, one will be exposed properly as determined by your meter, and one will be overexposed. Here is an example from the FDR Memorial in Washington, DC. I took these during late morning – the sun was already high in the sky, and it was difficult to get both a blue sky in the photo, and to read the text on the memorial.

Washington, DC

©TimeLine Media - HDR photography in Washington, DC
©TimeLine Media – HDR photography in Washington, DC

In this first photo, the frame is overexposed but you can clearly read the text. The sky is bright white with no detail, and some of the cherry blossoms are washed out as well.

©TimeLine Media - HDR photography in Washington, DC
©TimeLine Media – HDR photography in Washington, DC

This is the correctly exposed photo using the Matrix Metering in my Nikon DSLR. It is the most even across the frame in terms of dark tones and light tones.

©TimeLine Media - HDR photography in Washington, DC
©TimeLine Media – HDR photography in Washington, DC

This is the underexposed frame – most everything is in shadow, only good detail in the sky and other bright parts of the frame. With these 3 images, you combine them in software. For this, I used Google’s Nik HDR Efex pro 2. The software stacks the images, and uses calculations to increase the dynamic range of light and dark tones in the photograph to get a better approximation of what your eye sees when you are standing at the memorial. Let me know it turned out! There are many plugins and other techniques to combine with HDR to make scenes look either more realistic, or surrealistic depending on your preferences. It is always nice to have options. Here is the final HDR photo –

©TimeLine Media - HDR photography in Washington, DC
©TimeLine Media – HDR photography in Washington, DC

TimeLine Media – www.timelinedc.com
703-864-8208

Extreme Shutter Speed – Tech Thursday

©TimeLine Media - extreme high shutter speed

With Adobe Lightroom, it is very easy to sort your photos by all kinds of metadata. You can have the program show you photos that only meet certain criteria. Thus, you can gain some interesting insights into your photography. Very quickly, you can see what your “favorite” lens, camera, aperture, or shutter speed is just by looking at the raw numerical data. In college, I had a lot of training in reviewing scientific data, so having this metadata available for my photography is really cool!

Adobe Lightroom

This time, I have looked at the shutter speed of all of my favorite 19000+ photos that I have kept from all of my shoots since 2004. These two photos were examples of the highest shutter speed allowed by the Nikon cameras that I use. The first is a little expected – a kite flying by the overhead sun. This was at the kite festival on the National Mall which seemed appropriate for an American-flag flyer.

©TimeLine Media - extreme high shutter speed
©TimeLine Media – extreme high shutter speed

The second was a little more unexpected for me – a bride in an open field just after her wedding. It was a beautiful late spring day, and the sun was out, but I don’t recall it being that bright! There was some nice shady trees behind her, and behind me, so maybe that is what I am remembering. In looking at the Lightroom adjustments, this photo did not have to be “recovered” by pushing the Exposure slider either, so this is how the photo came out of the camera.

©TimeLine Media - extreme high shutter speed
©TimeLine Media – extreme high shutter speed

Shutter Speed

These next two show the slowest shutter speeds I have in my portfolio. This first one was exposed for 30 seconds. This is about the limit you can keep the shutter open before the moon and the stars start to lose their roundness, and start to smear light across the frame. Even with the long exposure, the photo needed to be pushed 1.5 stops higher in software to get it like this:

©TimeLine Media - extreme low shutter speed
©TimeLine Media – extreme low shutter speed

This last photo is the longest exposed photo in the collection – exposed for 1378 seconds – almost 23 minutes! I was attempting to make a star trail photo in the country. There were some clouds that moved through that you can see as the white streaks on the left. This was my only real attempt to do this as there is too much light pollution to do this near my home. Unfortunately, I did not get the North Star to center the photo, and there are too many sensor spots going through the trails to really show this on a larger scale. Guess I will have to try it again sometime. Take a look through your photos and see what lies at the extremes of your shutter speed scale.

©TimeLine Media - extreme low shutter speed
©TimeLine Media – extreme low shutter speed

TimeLine Media – www.timelinedc.com
703-864-8208

1 16 17 18 19